Widgetbox - Great collection of widgets
Now that you know how to add a widget to your blog, you might want to check out www.widgetbox.com. On that site you have a huge collection of thousands of widgets - and you can even create a widget of your own blog, so others can add your latest entries to their blogs. How cool's that?
Adding a widget is failry easy. At Widgetbox, you can preview the widget before adding it, then create one specific for your blog. You can even select width and height - at least those I've played around with offered those features (keep in mind the width of around 200 pixels for your standard blog sidebar). Next, you click "Get widget". A small list of options opens. There, choose "Get Widget Code". Then either copy the Javascript or the Flash code into your sidebar - as I described in the previous article. Should be up to you what code you copy, though I've taken the Javascript code.
- »Permalink
- 1 comments
- Send entry
- Posted by: leifkoch
How to add a widget to your blog or portal
Ever came accross a blog displaying some cool add-on in the sidebar? Like displaying the local weather or a counter? These small items are called widgets. The web already offers a large number of widgets, so you'll definitely find something you like. And there's nothing easier to add HTML-based widgets to your blog, or even to all blogs within your portal. When choosing a widget, please note that you should stick to the width of your sidebar, which is usually between 180 and 200 pixels. In case you can choose a width for the widget, try those values since they should match best.
So here's a short how-to for your portal and a blog, once you've received your widget code:
1. Adding a widget to your blog
You need to be logged in and navigate to your blog administration pages. There, you navigate to "Weblog -> More options -> Sidebar". On that page, simply paste the HTML code for the widget into the text are labeled "Source code". Save it and you're done.
2. Adding a widget to your portal
Again, you need to be logged in and navigate to your administration pages, this time as a portal administrator. Next, go to "Layout -> More options -> Buttons". You'll see the editor where you can enter sidebar information for all your members. There, click the little "HTML" icon in the editor's menu bar and paste your widget code into it. Then, click "Update", choose the visibility of that widget, and click "Save".
Tipp: In case you want to have your widget be centered horizontally within your sidebar, you can easily do this as follows: before the beginning of your widget code, put this code:
<div align="center">
and after the end of your code put
</div>
That's it. Enjoy your widgets!
- »Permalink
- 3 comments
- Send entry
- Posted by: leifkoch
How about a poll on your portal or blog?!
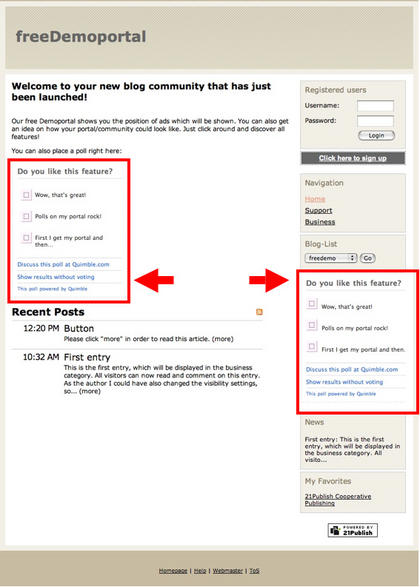
Ever thought of posting a poll for your readers? Well, it's easier than you think. There are many free poll tools out there, whereas this time my choice is Quimble. Just sign up for a free account and start create your own polls. You will then be provided with an HTML-code, which you can either integrate in your sidebar of your portal or blog or within an entry.
Please notice: before you paste your code in the editor, make sure you disabled javascript at your browser. Once pasted, you enable it again and voila, you will hae your poll. This also works for other scripts, which include javascript. Here is an example:

- »Permalink
- 3 comments
- Send entry
- Posted by: marceldembach
